Saturday, May 30, 2009

Lessons from Tim Holtz- Part 2

Lesson number two of the Tim Holtz Ideaology Class.


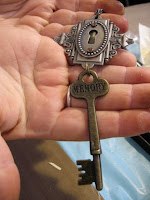
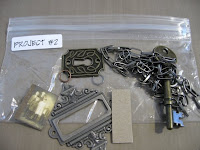
Supplies: Ideaology: Ornate book plate,keyhole, word key, link chain, jump rings and long fasteners, chipboard cut to fit book plate frame, liquid adhesive, dictionary paper

1. Apply liquid adhesive to back of keyhole and place over photo, centering the hole to allow subject to peer through. Let dry.
2. Adhere dictionary paper to chipboard and glue into the back of the ornate plate. Let dry.
3. Trim excess photo from around keyhole.
4. Place ornate plate on mat and position keyhole over the chipboard.
5. Pierce through holes of keyholes with craft pick and secure keyhole to the book plate with long fasteners.
6. Texture fasteners with hammer, if desired.
7. Attach top of ornate plate to center link of link chain using 2 small jump rings.
8. Attach word key to bottom of ornate plate with 2 large jump rings.
Ta-Da!

Thursday, May 14, 2009

Lessons from Tim Holtz

Here is Project 1 from the Tim Holtz Idea-ology Intrigue class I recently took. For this you will need: 
ornate plate 
chipboard
liquid adhesive 
grungepaper 
distress ink 
long fasteners (included in the ornate plates package) 
metal foliage 
link chain 
4 small jump rings

1) Adhere cut chipboard that is cut to fit into the center opening of the ornate plate with liquid adhesive after covering it with your choice of paper, ink, etc.
2) Punch flowers from the grungepaper.
3) Ink flowers with Distress Ink using an ink blending tool or your fingers.
4) Shape petals by rolling them between your fingers.
5) Pierce through center of the larger grungepaper flowers.
6) With flowers on piercing tool, pierce through chipboard to position and remove from pick.
7) Insert long fastener through smaller foliage, then through large grunge flowers and then through chipboard. Secure fastener.
8) Pierce through center of smaller grungepaper flowers.
9) With flowers on pick, pierce through chipboard to position and remove from pick. 
10) Insert mini fastener through smaller grunge flowers, then through large foliage and then chipboard. Secure fastener.
11) Insert long fasteners through the holes in the ornate plate.
12) Attach link chain to ornate plate using 4 small jump rings, using 2 rings to secure each end of the chain to the frame.
13) Apply a small amount of adhesive to the back of the brads for extra security.


Thanks to Tim Holtz for encouraging his students to share his vision. He is simply fabulous! 
http://www.timholtz.typepad.com/

Also, thanks to Janet Paz for sharing her photography with me!

Check back next week for Project 2!
luv, L.