Hope you have a great day!
Wednesday, September 30, 2009
October Kit reveal at Paper Popsocles!!
So here is the full reveal, my friends! I got the "Loud Talker" kit this month, full of yummy Sassafras Lass, Pink Paislee, Jenni Bowlin and some bling, Shimmerz, felt flowers and chipboard. I LOVE the Amplify line from Sassafras! This paper speaks for itself, has so much vibrancy that you can add a photo, a few embellies and ta-da! A great layout. Head over to Paper Popsicles to see the full kit details, http://paperpopsicles.com/index.html, and scroll down for the projects I made from it.
Friday, September 25, 2009
They are out!
Paper Popsicles has released pictures of the October kits. This is the kit I have been lucky enough to play with for the last few weeks and let me tell you, I have had a blast with it! The kit is called Loud Talker, which I love too!
Lots of Sassafras goodness in there, with a perfect addition of Pink Paislee, ZVA, BG Bling It, Jenni Bowling and some Creative Cafe. Oh, and don't forget the Shimmerz and the fun Buzz and Bloom chipboard that I used for a very fun altered project as an extra idea.
The other kits are full of scrappy goodness too and I probably would have bought them all to add to my own stash, but after seeing what the fantabulous Design Team made with these kits, there is no doubt I will be purchasing them. Sigh. I really may have to get a part time job to support this habit.
Just for fun, here is one last sneak peek at one of the projects I made with the Loud Talker kit.
Lots of Sassafras goodness in there, with a perfect addition of Pink Paislee, ZVA, BG Bling It, Jenni Bowling and some Creative Cafe. Oh, and don't forget the Shimmerz and the fun Buzz and Bloom chipboard that I used for a very fun altered project as an extra idea.
The other kits are full of scrappy goodness too and I probably would have bought them all to add to my own stash, but after seeing what the fantabulous Design Team made with these kits, there is no doubt I will be purchasing them. Sigh. I really may have to get a part time job to support this habit.
Just for fun, here is one last sneak peek at one of the projects I made with the Loud Talker kit.
Wednesday, September 23, 2009
As promised!
Here is my version of this week's Paper Popsicles layout sketch. I HAD to do Halloween!! This LO is a combo actually. The sketch is Lynda's, the idea is from ScrapFit's workout #4, which is to use photos with no people in them and using some Cosmo Cricket. Here it is with one of my Halloween decorations and then without.


Oh! And didn't I promise something else yesterday? What was that again? Ugh, coffee hasn't kicked in yet. RIGHT!! A Paper Popsicles October kit sneak peek! How could I forget?

Oh! And didn't I promise something else yesterday? What was that again? Ugh, coffee hasn't kicked in yet. RIGHT!! A Paper Popsicles October kit sneak peek! How could I forget?
Head over to the Paper Popsicles blog to see more sneak peeks for the other wonderful kits Melissa has put together for October. http://www.paperpopsicles.blogspot.com/
Friday, September 18, 2009
"Plastic" flower how-to
First you will need Shimmerz paint, paper flowers, a watermark pad, Ultra Thick Embossing Enamel, (known from here on as UTEE) and a heat gun. I also use my craft sheet and a tin roasting pan from the dollar store.
Paint the flowers with the Shimmerz, adding as many coats as desired. Let dry or use your heat gun to speed up the drying time.


Press the face of the flowers into the watermark coating them completely with the ink. Then cover the flower with UTEE.
Heat the flower up until the UTEE is melted. Let cool. For a more plastic look, repeat the watermark, UTEE and heating up process.
Monday, September 7, 2009
Other than that, it has been a productive weekend. I completed two layouts for next month's kit, the above layout and a card. I plan on heading back into the Hole to create some more. I hope everyone had a wonderful weekend!
Wednesday, August 19, 2009
I am terribly partial, but...
I think I have the cutest niece in the world. I have just returned from small town, Oregon visiting my family and was able to spend a lot of time with my niece. She is so adorable. I love going home, it is a totally different way of life. The fresh air, the dirt, the quiet, I spent as much time outside as I possibly could soaking it in. My mom has beautiful flowers on her deck and the wind through the trees made it a small piece of heaven.
luv, Lora
Monday, August 3, 2009
Coming up for air
Here is a quick layout I recently finished. For some reason, July was one of those months that I just couldn't hit my stride. I have done a few things here and there and as soon as I get photos, I will post.
Monday, June 22, 2009
Something outside of scrapping
Today I just felt the need to do something other than scrap, so I made two necklaces. I had purchased these super cute bottle caps with owl pictures and little owl beads from my friend, Daniela Costa over at The Art Life, http://www.theartlife.typepad.com/, and wanted to make them into something I could see more often than a scrap page. I drug out my beads and played with them for the first time since Christmas. It is a pathetic collection I will admit. Here is the outcome of my labors.


There is something cathartic about beading for the most part. Almost like coloring, it is very relaxing. I don't do it often enough, but who has enough time these days?
On a scrapping note, I did finish this cute LO of my niece last night. I used one of the June kits from Paper Popsicles for the patterned paper, rub ons and most of the flowers and bling. There are a few things that are from my own stash. I had to scrap this picture, look at that grin!
Friday, June 19, 2009
Another Lo for the ScrapandStamp Challenge
I was so inspired by the sketch over at ScrapandStamp blog that I had to create another LO based on it. I told you to stay tuned for a really funny story, so here it is. These pictures are from a day when I had taken my siblings to have professional photos taken and my sisters were lined up on the hearth in red, white, red. I grabbed my camera to take this first shot. A few moments later, Hailey was holding one of the kittens and it was struggling to get away. Well, apparently the kitty really needed to go potty and since she wasn't letting loose, the kitty couldn't hold it anymore. It went. On Hailey. As gross as it was, it was a funny situation and I HAD to take photos. The story was so long that I had to hide the journaling under the photos.


Sunday, June 14, 2009
First Crop
I love crops! I went to my first one yesterday and am pretty happy with the outcome. I was able to get two layouts completed from start to finish, another page in a mini book finished and a third layout polished. I think I am going to have to go to these more often.
Friday, June 12, 2009
Graduation
So one of the challenges over at Paper Popsicles was to scrap the theme of graduation and use school colors. I honestly had no immediate plans to do this, but when the challenge was issued, I thought, why not? This page came together in a matter of moments, so it must have been meant to be. Love when it happens like that.
Labels:
black,
graduation,
red,
scrapbook,
white
Thursday, June 11, 2009
LO for a challenge
I have been very into challenges lately. They have helped keep my creativity flowing. Here is a LO that I did for a challenge at http://scrapandstampsaturday.blogspot.com/ Alex, one of the hosts of this blog, is on another board I am on and she is uber-talented. Loved this sketch and have another LO planned using it as well. Stay tuned for that one, it has an interesting story behind it.

Wednesday, June 10, 2009
Round #3 of Tim Holtz Ideaology
Here is the third project from the class. *Please note, if I am not clear on something or you have questions, please do not hesitate to ask.


Supplies:
Ball chain
small swivel clasp
4 small jump rings
Muse Token
mini safety pin
long fastener
washer
game spinner
large sprocket gear
small sprocket gear

1. Attach 2 small jump rings to Muse Token.
2. Pinch swivel clasp and swivel open.
3. Slide Muse Token onto swivel clasp and secure clasp closed.
4. Insert mini safety pin through prongs of long fastener.
5. Insert long fastener through washer so that the mini pin is sitting on top of the washer.
6. Insert game spinner on long fastener.
7. Insert large sp
rocket gear on long fastener.
8. Insert small sprocket gear on long fastener.
9. Insert through hole at the "bottom" of the swivel clasp and secure closed.
10. Attach 2 small jump rings to the large sprocket gear.
11. Thread ball chain through jump rings.
Voila! Super cute necklace!

Saturday, May 30, 2009
Lessons from Tim Holtz- Part 2
Lesson number two of the Tim Holtz Ideaology Class.

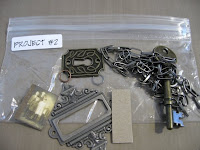
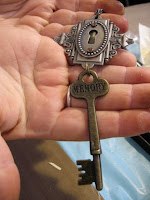
Supplies: Ideaology: Ornate book plate,keyhole, word key, link chain, jump rings and long fasteners, chipboard cut to fit book plate frame, liquid adhesive, dictionary paper
1. Apply liquid adhesive to back of keyhole and place over photo, centering the hole to allow subject to peer through. Let dry.
2. Adhere dictionary paper to chipboard and glue into the back of the ornate plate. Let dry.
3. Trim excess photo from around keyhole.
4. Place ornate plate on mat and position keyhole over the chipboard.
5. Pierce through holes of keyholes with craft pick and secure keyhole to the book plate with long fasteners.
6. Texture fasteners with hammer, if desired.
7. Attach top of ornate plate to center link of link chain using 2 small jump rings.
8. Attach word key to bottom of ornate plate with 2 large jump rings.
Ta-Da!

Thursday, May 14, 2009
Lessons from Tim Holtz
Here is Project 1 from the Tim Holtz Idea-ology Intrigue class I recently took. For this you will need:


ornate plate
chipboard
liquid adhesive
grungepaper
distress ink
long fasteners (included in the ornate plates package)
metal foliage
link chain
4 small jump rings
1) Adhere cut chipboard that is cut to fit into the center opening of the ornate plate with liquid adhesive after covering it with your choice of paper, ink, etc.
2) Punch flowers from the grungepaper.
3) Ink flowers with Distress Ink using an ink blending tool or your fingers.
4) Shape petals by rolling them between your fingers.
5) Pierce through center of the larger grungepaper flowers.
6) With flowers on piercing tool, pierce through chipboard to position and remove from pick.
7) Insert long fastener through smaller foliage, then through large grunge flowers and then through chipboard. Secure fastener.
8) Pierce through center of smaller grungepaper flowers.
9) With flowers on pick, pierce through chipboard to position and remove from pick.
10) Insert mini fastener through smaller grunge flowers, then through large foliage and then chipboard. Secure fastener.
11) Insert long fasteners through the holes in the ornate plate.
12) Attach link chain to ornate plate using 4 small jump rings, using 2 rings to secure each end of the chain to the frame.
13) Apply a small amount of adhesive to the back of the brads for extra security.


Thanks to Tim Holtz for encouraging his students to share his vision. He is simply fabulous!
http://www.timholtz.typepad.com/
Also, thanks to Janet Paz for sharing her photography with me!
Check back next week for Project 2!
luv, L.
Labels:
Grungepaper,
Ideaology,
jewelry,
Tim Holtz
Tuesday, March 31, 2009
I LOVE this page
I just did this layout, (actually, started it last night but by 1:00am, I was afraid to glue anything down), and I love how it turned out. It is about my bed and how much I love my bed. Funny thing is, I sketched the layout for this in my notebook and laid it out. Then this morning, I happened to be thumbing through my current issue of Memory Makers and realized that there was a lay out almost IDENTICAL to mine, even including the same "love" sticker. So, now I am not sure if it is a weird stroke of fate or if subconsciously I was channeling the fantastic one by Jaime Warren on pg. 63 of the March/ April '09 issue. I don't remember her layout before this morning, but just in case, I am going to give her a nod since they are really close. So, Jaime, thanks for the inspiration. It is no wonder you are a MM Master.
"I LOVE this place!"- I my bed, Quite likely too much, as it seems I spend too much time in it. It is cozy. I've put a lot of effort into making it so. Being tucked in it is one of my most favorite places. (under the "X" that marks my side of the bed)


Friday, March 27, 2009
Friday...
Sorry that I haven't been keeping up with this blog as much as I have intended. I have been so busy looking at other blogs that I haven't made the time to post here. So, I am going to quickly post the most recent layout I have done for scrapbooking and then promise I will be back by Monday with some more interesting things. Have a wonderful weekend!!
"Don't" -(My beautiful sister, I know you want more tattoos. But you are so perfect as you are, you don't need decoration to make you so. & they are forever.)
luv, L.
Subscribe to:
Posts (Atom)