Tuesday, December 6, 2011

Let's Get Caught Up

Wow these last few days have just zoomed by! I have been working on the DD. Here are the pictures of the recent pages.


Hope your December is so far full of joy and merriment!

Friday, December 2, 2011

Off to a good start

(Chuckle!) So here is the day one page of my DD. I am off to a great start so far! Let's hope I can keep it up! ;)


On the agenda for day two's photo to take: A picture of a list. That should be easier enough as I have list everywhere!

Thursday, December 1, 2011

It is upon us!

Whether you look at December with a bit of dread because it marks the end of another year or if you see it as the last hurrah before a brand new fresh year, it has arrived. And with it comes another chance for yours truly to complete a December Daily journal.

Yes, as you may or may not recall, I have metnioned, (promised, sworn, guaranteed), that I was going to see this project through in the years past and each time, I have quietly allowed the project to go unfinished, to hang over me as incomplete.

Well, not this year!

I have forgone the grandiose plans of an in-depth account of the next 25 days and of creating something each evening inspired by that days events and photos. Instead, I have decided that for me, I need to follow the KISS method.

Oh, and I should mention, I also had a friend in this endeavor. Yep, my dear friend, Daniela, told me that she was creating a December Daily kit, complete with the stuff you needed for the journal as well as daily inspiration on her blog and frankly friends, I decided it was best, (i.e. easiest) for me to let someone else do the dirty work.

See, Daniela has already put all the papers together along with the matching number stickers, journaling cards, and quote tags, plus a wonderful little baggie of holiday flotsam and jetsam to decorate with. How much easier could it be? In addition to all that, she offered a deal if you purchased the new limited edition Tim Holtz Winter Distress Inks and the kit together. Music to my ears.

And here it is:


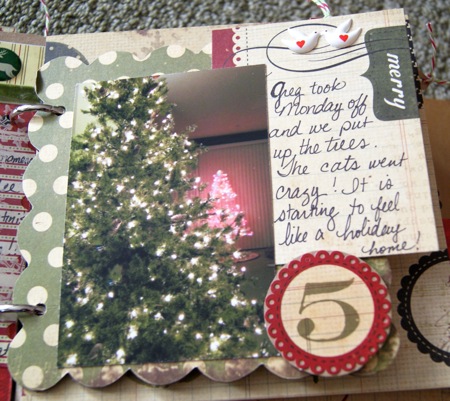
I am about 75% done with the inside pages, prepping them to be ready to pop in a photo and/or journaling. I have added pieces from my own stash, pieces that I can now find in my supplies thanks to my purging, but truthfully, you wouldn't need to add a thing. This kit has everything you need except glue and the memories. This book came together so quickly and perfectly. If you want to do the December Daily trip it isn't too late to grab one of these for yourself or even to have for next year. Now THAT would be a head start!

The Art Life Shop's December Daily Kit

In addition, I am going to post my pages daily and I want to share with you the picture sheet that I will be following for the next 25 days to help me with my task. I discovered it on Pinterest, but here is a link directly to the author's blog. She has some incredible lists and suggestions for photos.

Katrina Kennedy 


 25 December Daily Photo Ideas 
1. Something Red 
2. A list 
3. The Christmas tree 
4. Presents wrapped under the tree 
5. Something warm and tasty 
6. A candy cane (or many) 
7. A wreath with a red bow 
8. Stamped and addressed Christmas cards 
9. Santa Claus 
10. Away in a manger 
11. Ribbons and bows 
12. Something sticky 
13. Reindeer 
14. A decked hall 
15. Silver bells 
16. A hippopotamus 
17. Under the mistletoe 
18. A cup of cheer 
19. Toys in every store 
20. A winter wonderland 
21. Tiny tots with their eyes all aglow 
22. Holiday greetings 
23. A shining star 
24. Children, sleeping 
25. The number “25” 
My Gear & Technique 
Through December I will shoot a lot with my 50mm lens to help with lowlight situations. I will grab my 70-200mm lens for stealth close ups and details from a distance. 
I’ll shoot a lot on some days, only a shot or two on others. 
I will enjoy the month and make sure I’m in at least a few photos! 
Katrina Kennedy 
Capture Your Holidays: Through The Lens 


Sorry, I tried to upload the pdf but was encountering problems that I have no doubt are user error. :)  But here is the list, nonetheless.

Lastly, in news of the scrap space, the purging continues. I am SO close to being done, but now am at the point where there is piles on the floor that just don't really go anywhere and I feel like I have been doing this for so long that I am ready to just dump it into the donation boxes and say, "forget it." All I want to do now is create. I know, first world problems, right?

Here are a couple of photos of the drawers that make me smile every time I open them because 1) they are so colorful and 2) it is all finally in one place.


Wednesday, October 19, 2011

"Let's Do This"

No, I haven't really fallen off the face of the Earth. I haven't totally crawled under a rock and I haven't gone off the grid, although all of those seemed like good ideas recently. Suffice it to say, I went through a pretty emotionally draining summer with family and while everyone is perfectly healthy, it took a larger toll on me and my creativity than I would have anticipated.

But yesterday was the first time in a very long time that I woke up feeling like myself. I had the old Lora attitude of looking forward to Monday, with all it's fresh opportunities. I was ready to be an contributing member of this sitcom called Life. In other other words, "Let's Do This."

And I did. I created my first layout in two months.  I love the Jenni Bowlin Holiday lines the she launched this year and this paper was begging to be used, so I found enough of my desk to work with and made a layout featuring none other than that cutie pie niece of mine.


The paper really did most of the work for the layout, needing little embellishing. I added the spider and lace tapes to the present word border on the bottom, a Maya Road calendar page, and the super awesome wood spools star buttons from Prima. I have a tendency to have little "bags of crap" that accumulate in my stash. These generally contain the flotsam and jetsam of projects past. I can't get rid of them because the stuff is still great, but they don't really go with anything else either, so there they sit.  I am proud to say that the trick or treat bag, the orange frame, the ball trim, the photo turn, and the orange pinked corner, (which is another frame just tucked under the photo), are all pieces from one such bag. There! See I DO use them. Eventually.


The last piece is a journaling tag tucked into the treat bag. I love how the house and tree silhouette adds a little sumpin' sumpin' to the overall layout and I black stickled the tree for a bit of detail. While the title on the journal card said, "Tonight's Memories," I decided it was perfect for my memories of spending time with my niece recently and how much she loves to dress up.

I don't scrap a lot of Halloween layouts. Maybe because I don't have kidlets to take photos of, maybe cause the Hubs and I don't really dress up or go anywhere. It certainly isn't for lack of Halloween related scrap stuff! I have decided to try and scrap it more though, since it is a holiday I love and try not to focus on having a "Halloween" photo for the paper, but more month of October memories that can also work.

Oh, and by the way, I am SO glad to be back!

Monday, September 12, 2011

Funky, funk, funk

That is the state I have been in lately without the bellbottoms and groovy hair. I seem to have hit a rough funk on the creative side of life lately that I am slowly coming out of. This last weekend was full for my family. We had a very good friend visit from NYC and I wanted to make her something, so I whipped out the mini below in a matter of hours and was shocked at how cute it came out. There is something to be said about lines of paper with matching quote stickers.


Sorry for the horrible photos. These were taken in my lap in the car as the Hubs was cruising at 65mph over the ridiculous CA freeways here. I am surprised they aren't more blurry. With a breakfast that took way longer than planned and multiple false fire alarms, I simply ran out of time to snap photos before leaving the house.


Tuesday, August 30, 2011

Two-fer Tuesday

I haven't been scrapping much or even thrifting much lately. I have been reading. A lot. I realized that I finished four books in the last five days, including the Hunger Games trilogy, which I am still digesting.

I have made the following two layouts in these past few days, both featuring new lines from CHA-S.


Featuring Amy Tan's line with American Crafts. This is the second layout I have made with this line and I have to say, her style so meshing with mine. I LOVE the color blue in this line. I had to scrap this photo as it made me smile because it is so my cousin and it shows her funny side that usually results in us on the floors, laughing so hard the tears run down our legs.


This is a layout that started as one of my sketches. I used pieces from Basic Grey's Indie Bloom line, which I LOVE. The colors are so yummy. The little pom-poms are made from twine and there is a blog on how to make them here.

Monday, August 22, 2011

Monday (Page) Maps


It began with inspiration from Becky Fleck's Page Maps books and turned into this.

Saturday, August 20, 2011

The random thrift art post

This is a totally random post with a totally random story to go with it. As I am sure I have mentioned at least once, I love to thrift. I mean, I REALLY love to thrift. It makes me feel like a kid on Christmas morning. So yesterday I went to a nearby town that I had heard had good thrift stores and a fair number of them in a small radius. I happened upon two pictures that weren't something I would describe as my style, but I was drawn to nonetheless.

Here is where the random story comes in. It wasn't random in that it is off topic, but more what happened. I took the two pictures to the counter and was making small talk with the cashier. Here is how the conversation went down.

Her: "These pictures are interesting aren't they?"

Me: "Yeah, I am guessing they are kind of old."

She picks up the picture, puts her nose to the back of it and inhales deeply.
Her: "1950's."

Me: "I beg your pardon?" (As I tried to not let my jaw hang open in disbelief).

Her: "You can tell by the smell, they are from the 1950's."

Thought in my head: "Are you messing with me?"


I have to admit, friends, when I got into the safety of my own home with my treasures, I cautiously sniffed the back of one of the pictures. I am pretty sure I can guess what the 1960's and the 1970's smelled like and I know the 1990's smelled like Teen Spirit, but I am not sure what the 1950's smell like, but I smelled nothing.

Friday, August 19, 2011

Friday's Finish!

Whew! It feels good to get things off of the "Please Finish Me" list. I started this pair of silhouettes for my aunt back in May and just couldn't get the right touches to finish them and send them off to her. Ah, but finally, I have.


They started as two white ceramic discs that could be hung up. It was a stroke of genius that I realized if I added duct tape to the ceramic base, it would make it more easy to decorate. I am not sure if you have ever tried to paint or decorate a piece that has already been fired, but it is a pain in the tush. My aunt has a thing for zebra, so this was the logical choice in my mind.


Then I added the burlap and printed the silhouettes on sticky back canvas. I picked a boy and a girl cause as life would have it, my aunt has a boy and a girl. It was the back piece that I struggled with until I remembered I had a Cricut and I can cut pieces to size.


I deconstructed a record album cover for the scalloped circle, painted it, Rock Candy crackle painted it, and then Walnut Stain inked it. I also re-colored some of the beads from the hanging wire to make them more fitting for the color scheme.

Funny, now that I am looking at them, I think they need feathers....

See my dilemma with trying to finish things?

Have a great weekend!!!

Tuesday, August 16, 2011

A technique tute on Tuesday!

As promised, here is my loose glitter fix. Well, it isn't actually mine, since I got the idea from Natasja Verbeek, but this is how I do it.


Gather your supplies: tray, Gluber, loose glitter.


Peel off one side of the film from the Gluber and pour the glitter over the circle. *Note-- you do not need to cover all of it. Just get a nice amount down.*


Use your finger to spread the glitter around the Gluber. This is why you don't need to totally cover it to begin with. You can always add more. While you are spreading it with your finger, push the glitter into the Gluber. This will help it not flake later.


As my niece says, "Da-Da!" While this trick doesn't completely eliminate the mess of working with loose glitter, (seriously, I still had it all over myself, but maybe that is just me), it does cut down on the flaking once on the project.

At this point, you can brush off the excess. I was pretty rough with mine, using my fingers to rub the Gluber to remove as much extra as possible before peeling it from the backing and sticking it on my project. Also, while it looks like there are spots I missed, the Gluber is covered and once adhered, any light spots disappear.

So, as I laid in bed on Saturday night, I was thinking about how cool this turned out and what else I could do with Glubers when inspiration struck! I had to force myself to remain in bed and wait until morning to try my idea.


If a Gluber works so well with glitter, then how would it do with micro beads? I have always loved the look of micro beads, but the idea of trying to adhere them gave me nightmares, so the jar sat on my shelf, taunting me.

Haha! No more!

I used a 2" circle punch to match the size of the Gluber, punched an image from the paper, and followed the same process as above.


Again, rub those little boogers into the Gluber to make sure they stay. It can take more abuse than you might think.


Oooh, pretty!!! At this point, I am literally doing my "I am a genius" dance. If you have never seen it, you are totally missing out.


I know, I know! I even made a card! I was thinking how cute would these be as centers for larger Glubers that you make into flowers? I tried it but they were way too big for the card.

Get out the loose glitter and micro beads, my friends. The time has come to make them earn their keep!

Wednesday, August 10, 2011

Home Sweet Home

So I am going to do my best to post even though Blogger seems to be having some trouble.


I woke up to this beauty the other morning. I have been trying to grow an orchid for at least five years and I have never succeeded in getting one to bloom, but that stops here! Can you see those other buds? Oh yeah, those are four more waiting to show their glory!


This is what my desk looked like, (still looks like), while I was creating today. I totally wipe out any surface. But it is all in good fun. This is what I was putting the finishing touches on:


The other project from the second Tim Holtz class that I took a week ago. This is a canvas with pieces of his paper stash stacks adhered and then covered with beeswax. I decided to make mine into a house complete with windows to the people who live there.


See the man on the left? He is actually in love with the lady over on the right. Unfortunately, it is unrequited as the lady desire is obviously in love with the man in the window with her.


Here is another inhabitant peeking from her window. See the little girly on the pig underneath the window? That was a found piece from the stacks shared with me by my BFF, Daniela.


I loved the boy and his dog and his little bro peeking out of the ornate window to the left. Oh, and as a little bit of tongue in cheek, I used the floral patterned paper for the triangle under the rulers. It is flowers in the attic. ;P

Tuesday, August 9, 2011

"She..." series Part I


This book features quotes about empowering women. I was directed to the book by Elizabeth Kartchner on her Dear Lizzy blog and have since decided that it is something that every female I know should have. It was while thumbing through the book that I hit inspiration to do a series of layouts based on the quotes featuring pictures of the women in my life.

I started with an idea and a white sheet of 12x12. I used my clear Sakura Glaze pen to write a secret message on the page.


Its there, I promise. The Glaze pen works like a resist in a way. Let me tell you though, clear ink on white paper is a pain on the eyeballs. While I was working, I had a special helper.


Her job? Keeping me thoroughly entertained with her attempts to hide and to kill the ribbon attached to my distressing tool.
What do you mean this space isn't for me? It is obviously the perfect size!

Her other job was to be where I least expected her to be when it was time to put stuff away. Remember the secret message?


I had totally planned for this to be pinks and blues! Funny how you can start with a plan and then the creative just takes over.


I love how the Glaze resisted most of the paint. I did have to wipe the excess off with a paper towel, but I can see using this technique with other Glaze colors.


Another mess of embellishments at the base of the log. I made the log with sticky back canvas that I painted and then stamped the wood grain on. Cady's wings are from Pink Paislee's butterfly stickers. I had to sacrifice two butterflies for them but it was worth the cost. The little red and orange mushroom? Those are flat backed glass pieces that I found at a local stained glass store. Cute, huh?